 Keiron Smith
See the Sky as Never Before with the AllSky CCD mosaic
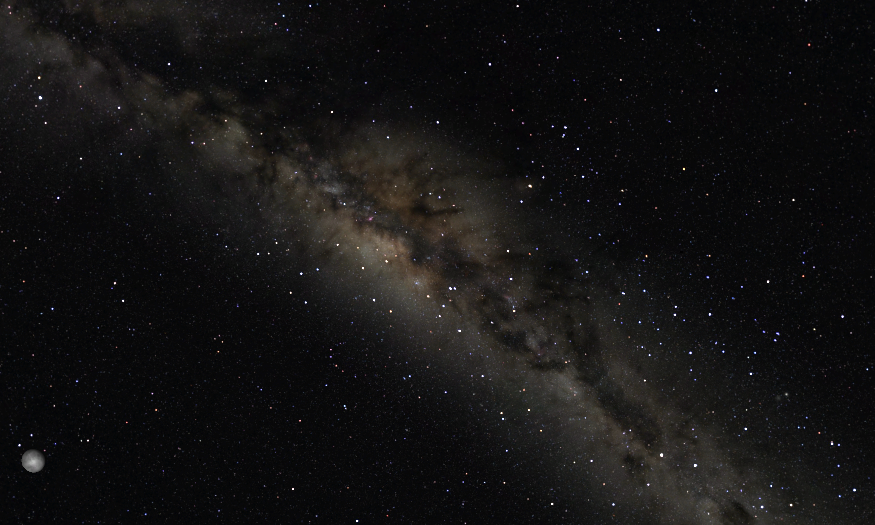
Weighing in at 6.44 billion pixels in size, the full-color AllSky CCD image mosaic of the entire night sky visible from Earth may be the biggest addition to Starry Night software since its inception. Named AllSky for its uniform coverage from pole to pole, it’s a single picture of the whole sky.
See the entire Milky Way in exquisite detail and then zoom in to explore dust lanes and nebulae. Instead of dots and circles, you will see an actual photo of a star or a deep sky object.
Smoothly and swiftly navigate this full color photograph of the entire night sky, to a limiting magnitude of 14-15. Five years in development, the AllSky CCD mosaic is comprised of about 20,000 individual images, originally imaged at a resolution of 12 arcseconds per pixel with a scientific grade, custom built AP9E CCD camera.
View on your computer screen what you would see if you were looking through a telescope. The overlay of the AllSky CCD image and data has been precisely mapped to Starry Night’s computer generated stars and databases.
Zoom in on any object in the AllSky image and see increasing detail as higher resolution images are loaded in. There’s more to explore in each of the 5 levels of the image resolution
Starry Night with the AllSky CCD
Starry Night Without the AllSky CCD

What makes the AllSky image so different?
The AllSky image presents the entire sky as a full-color, seamless mosaic, and at several resolution levels (5 in all) dependent upon your zoom setting. An important advantage of this is the consistent resolution, color and depth of coverage, eliminating the uncertainties of comparing images from many and varied sources. And navigating your way around, identifying objects or zooming in or out, is only a mouse click away.
How was the AllSky image created?
Our story begins in the Arizona desert. Three friends were discussing the possibility of photographing the entire Milky Way. Their conversation progressed… “Why stop there?” One suggested. “If you’re going to image the Milky Way you might as well get the whole sky.” It took five full years for the AllSky image to become a reality.
Peter Ceravolo, Douglas George, and Dr. Mitchel Savere were those three friends and they spent three years traveling all over Earth photographing the night sky with ‘Dorothy’, their scientific grade, custom built AP9E CCD camera.
It took over 20,000 individual CCD images to create a composite image that met their expectations.
The dust devils, cloudy weather, and traveling around the globe proved to be the easiest part of their adventure. When the time came to process the AllSky image, 10,000 hours alone were spent rating the brightness of the photos!
Try it out: Browsing the AllSky image.
- Open the Options pane.
- Click the toggle next to Stars to expand the Stars layer.
- Check the “AllSky Image” box. Note: When you click this option, most of the other databases will go off by default. The AllSky image is overlaid on top of the computer generated stars. This allows you to see an actual photographic image of the stars while still being able to place your cursor on top of any star and identify it.
- Click on the words “AllSky Image” to bring up the AllSky image options window.
- Move the Precision slider all the way to the left (More Precise) for the most accurate rendition of the night sky.
So what went on for the next two years to take the 20,000 individual photos and turn them into the seamless AllSky CCD mosaic?
- Image inspection. Had to remove all those pesky airplanes, artificial satellites and shooting stars that inconveniently flew by while taking the photos.
- Image Processing. You won’t see light pollution even if you live in Mexico City.
- Astrometry. Determining the exact location of each star to an area smaller than a pixel on your screen.
- CCD Bloom removal. The Moon and planets are just too bright, and they move- had to cut them out completely!
- Stacking. This is the collage portion of the task. Taking photos and overlaying them over and over so that you can see the edges.
- Image Compression. What do you mean my computer won’t accept a 60 GB photo file?
What can be done with the AllSky image?
- View millions of deep sky objects such as galaxies, nebula and star clusters.
- Connect your telescope and see the same thing on your computer screen as through your telescope.
- Zoom from 180 degrees to .05 degrees at a resolution of 12 arcseconds per pixel.
Try it out: Zooming in more than your eyes will let you.
- Open the Options pane.
- Click the toggle next to Stars to expand the Stars layer. Check the AllSky Image box. Note: When you click this option, most of the other databases will go off by default. The AllSky image is overlaid on top of the computer generated stars. This allows you to see an actual photographic image of the stars while still being able to place your cursor on top of any star and identify it.
- Find the Zoom Control on the upper right hand corner of the Toolbar and hit the plus sign to zoom in to 2” x 1”. Do it slowly as you zoom in, higher resolution images are loaded in.
- Use the benefits built into Starry Night for the best experience.
- Turn on constellations.
- Turn on labels.
- Print star maps.
In the end, what are you left with?
In essence, one big photograph approximately 6.44 billion pixels in size that will allow you to pan back and forth across the sky and zoom deeply into it from any place on Earth and see stars with magnitudes as low as magnitude 15. With Starry Night Pro Plus, there is a lot to explore out there.
AllSky CCD Image and Associated Data (C) 2005, Main Sequence Software Inc. All rights reserved.
Starry Night Pro Plus: http://store.simulationcurriculum.com/collections/software/products/pro-plus
Comments