 Keiron Smith
Honolulu Hawaii Panorama

This is the beautiful and exotic panorama we will be adding to Starry Night 7.
*** Note: there are two files attached to this KB article (courtesy of Sam Rhoads: https://support.simulationcurriculum.com/entries/21544297-Panorama-Competition-Honolulu-Hawaii ) that can be used as examples for testing. ***
Understanding the SN7 "Sky Data" folder/pathways for Windows PC and Mac OSX
Because of the ubiquity of the internet, the vast volumes of data available to us (and therefore you, the SN user) and new security requirements imposed by operating systems, Starry Night 7 has introduced the idea of a "dynamic" (writeable) Sky Data folder.
In previous versions of SN, the application itself would edit (write to) files in its own Sky Data folder located either in the application package (on OSX) or in the Program Files folder (Windows) and this is now considered very bad behavior.
For that reason, any time SN needs to write/modify a file, we do so in a new Sky Data folder located at:
(Windows) \Users\<YourUserName>\AppData\Local\Simulation Curriculum\Starry Night Prefs\
(Note that the AppData folder is often "hidden". A quick Googling can show you how to un-hide it)
(OS X) /Users/<YourUserName>/Library/Application Support/Simulation Curriculum/Starry Night Prefs/
Note that this is where any "streamed" data will be located too.
While we've made every effort to hide this ugliness from you the user, if for any reason you want to get your hands dirty and edit a file manually, it should first be copied to the same respective path (e.g. /Sky Data/Horizon Panoramas) in this new folder, then edited there.
What does this all mean?
Now, open Starry Night 7, select Horizon Panoramas, then select the new Honolulu Hawaii panorama!

What do you think? Want to make your own? Well then, read on!
Taking 360º Landscape Images
Instruction on how to take images to construct a 360º panorama image is beyond the scope of this help file. Briefly, you take a series of single overlapping images to get a complete coverage of the horizon around you. You them stitch these images together to form a 360º image. Some digital cameras have panoramic modes that guide you through the process, making them quite handy in taking images to construct panoramas.
Image Considerations
Your panorama image must have certain properties in order to work well in Starry Night 7.
- Must be a 360º degree panoramic image.
- Aspect ratio of 4096 x 512 pixels
- For Starry Nght Verison 7, images must be in PNG format.
Image Processing Tips
The following tips for image processing make use of Photoshop, although other image editing programs can be used.
Step 1:
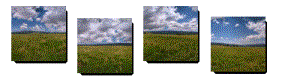
Your raw images will look something like the ones above. The first step is to stitch them together to form a continuous panorama image whose ends match exactly. This is an important step and special care must be taken, otherwise seams will be visible in your final image. Several commercial packages are available to help you.
Step 2:

The image below shows a stitched 360º panoramic image. This is the most challenging step in creating your own custom landscapes for use in Starry Night.
Step 3:

After the image is stitched, use the eraser tool - or a skillful hand with the magic wand and delete key - and remove the sky from your image. The sky is not required because Starry Night will simulate it.
Step 4:
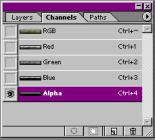
The next important step is to add an Alpha channel. Select your 'solid' horizon and add an alpha channel. The black represents 'no transparency' (so that your foreground is opaque) and the white represents '100% transparency' (so that your horizon's sky is transparent and Starry Night can fill it in for you.) Consult your image editing software's manual on how to add an alpha channel to an image. Although optional, the Alpha channel allows you to only see the horizon in your final image.
Turning only the alpha channel on, results in the image below. Ensure that the white area represents the sky.

Step 5:

When you save the image, save it in “PNG” format and ensure the Alpha Channels and Layers boxes are checked. The final image looks something like the image below.
Text File Considerations
The second component required to add your photorealistic landscape to Starry Night, is the accompanying text file.
Importantly! The panorama PNG and the accompanying text file MUST have the same name. For example:
Honolulu Hawaii Pano.txt
Honolulu Hawaii Pano.png
Now, for this example, we are using the "Honolulu Hawaii Pano.txt" file as a template (download the attached file). You can use this same file for your own panoramas. Just make changes to the code as required, and then save the new text file with your new name.
When you open the "Honolulu Hawaii Pano.txt" file, you will see numerous lines with the general format: <SN_VALUE name="XXXXX" value="XXXXX">. You only need change Part 1 to successfully add your image. You may leave all other lines and values as they are. But, if your panorama does not look very good, then modifying other parts of the code may be required. So, if you're disappointed with your result please review the code - it may be important to adjust the various parameters that line your image up with the compass, height above the SN horizon etc.
The file is as follows:
<HTML>
<BODY>
This file is a <A HREF="http://www.starrynight.com">Starry Night document.</A>
<SN_VALUE name="Version" value="Pro (Mac) - p400c-EM">
<SN_VALUE name="VersionSKU" value="p400c-EM">
<SN_VALUE name="charset" value="Macintosh-ASCII">
// Part 1
// Pano name - you see this in menus, etc. This should be unique for each pano.
// Change value="Honolulu Hawaii Pano" to a name that describes your image. For example, value="MyHorizon". The name you choose will appear in the drop box in the Horizon Options window.
// Change value="Honolulu Hawaii Pano.png" to the name of the PNG image you made and placed in the Horizon Panoramas folder. For example if you named your image "MyHorizon.png", change it to value="MyHorizon.png".
// Both the image and text file must be located in the Horizon Panoramas folder.
<SN_VALUE name="PanoName" value="Honolulu Hawaii Pano">
<SN_VALUE name="ImageFileName" value="Honolulu Hawaii Pano.png">
// Part 2
// Planet that panorama is associated with (in this case this panorama is only appropriate for the Earth)
<SN_VALUE name="PlanetName" value="Earth">
// Part 3
// In degrees, the height of the image. This value specifies the height of the image in degrees. A value between 45-55 is about right for most images.
<SN_VALUE name="ImageHeight" value="33.000000000000000000">
// Part 4
// If the image has an alpha channel that is set up with the sky having an alpha of 0 and the horizon an alpha of 1,
// with alpha blending at the interface, we need to say Yes here, otherwise say "no"
// Leave this value as yes if you added an Alpha channel.
<SN_VALUE name="UseImageAlpha" value="Yes">
// Part 5
// These values are in the coord system that you pick out with ImageCoordSys
// Think of ImageCentreDec as degrees Up and Down.
// A value of -11.0 means that the centre of your image lies 11 degrees below Starry Night's formal horizon line.
// SN's formal horizon line lies at 0 degrees Altitude as you may expect.
// Use this value to adjust your panorama until it looks right against the sky.
// You can even set this precisely by recording the actual rise or set time of a certain star/planet over a given obstacle in your panorama -e.g. a mountain peak- and set the ImageCentreDec so that it appears the same in SN.
<SN_VALUE name="ImageCentreDec" value="3.25000000000000000000">
//Think of ImageCentreRa as Left and Right. Adjust this value if your image is facing towards the incorrect cardinal direction.
<SN_VALUE name="ImageCentreRa" value="147.300000000000000000">
// Part 6
// These are also in ImageCoordSys coordinate system.
// They determine where the image will be.
// If you're not sure do not make any changes here.
<SN_VALUE name="ImageAxisDec" value="90.000000000000000000">
<SN_VALUE name="ImageAxisRa" value="0.000000000000000000">
// Part 7
// Adjusts the brightness of your horizon. The panorama brightness will be scaled with this value, up to a maximum of 1.0 (100%). If you want your panorama to appear half as bright, use a PanoBrightness value of 0.5 (50%).
<SN_VALUE name="PanoBrightness" value="1.00000000000000000">
// Part 8
// Used during liftoff to draw a horizon nicely. Ignored for panos like the milkyway which are always far off.
<SN_VALUE name="PanoBottomDistance" value="0.1">
<SN_VALUE name="PanoTopDistance" value="1.000000000000000000">
// Part 9
// Used during liftoff to draw a horizon nicely. Ignored for panos like the milkyway which are always far off.
// the color is red, green, blue, with each value scaled 0 to 65535
<SN_VALUE name="PanoApproxColor" value="40192, 39936, 38400">
// Part 10
// If preload is set, will load image on startup.
// You can have multiple images preloading when the program starts. However, this will increase the time that it takes for Starry Night to load.
// Ideally you only want one image to have a preload value of ‘Yes’, the one you use most often.
// In addition, when Starry Night loads, the horizon that is displayed by default is the one whose accompanying text file was read first in alphanumeric order from the Horizon Panoramas folder.
// If you want your panorama image to load first, give it a preload value of ‘Yes’ and name the text file so that it is listed first in alphanumeric order, such as Earth_00MyHorizon.txt.
<SN_VALUE name="Preload" value="No">
// Part 11
// ImageCoordSys values
// kNoCoordinateSystem = 0,
// kAltAzSystem = 1,
// kGalacticSystem = 2,
// kEclipticSystem = 3,
// kCelestialJ2000System = 4,
// kCelestialJNowSystem = 5,
// kOrientationSystem = 6,
// kSuperGalacticSystem = 7,
<SN_VALUE name="ImageCoordSys" value="1">
// Part 12
// ImageTransferMode values
// OpenGLState kNoState = 0,
// kDefault = 1,
// kStars = 2,
// kTransparentAdd = 3,
// kTransparentGlass = 4,
// kOpaque = 5,
// kShaded = 6,
// kLighting = 7, // shaded with specular lighting
// kShadedLine = 8,
// kBillboard = 9,
// For horizons, 4 (kTransparentGlass) and 5 (kOpaque) are
<SN_VALUE name="ImageTransferMode" value="4">
// Part 13
// It's a panorama image; leave the value always as 360º.
<SN_VALUE name="ImageWidth" value="360.000000000000000000">
</BODY>
</HTML>
The DDS Folder
The first time you choose your panorama Starry Night will convert the PNG file into a folder of DDS files. After loading the panorama one time the .dds files will be found in a DDS folder next to the original PNG. The DDS folder creation can take 10-20 seconds.
Did this KB article work for you?
Share your tips here. Share your panoramas with other Starry Night users (include the text files too).
Thanks for the detailed instructions! Unfortunately, this is not working for me with v7.5 on a Mac running the current OS (10.11.6). I tried my own horizon and the downloadable Honolulu one here. SN7 doesn't show either as existing. I placed the png and txt files in the Library/Application Support/Simulation Curriculum/Starry Night Prefs/Sky Data/Horizon Panoramas folder. Are the pairs of files supposed to be in their own subfolder?
Any help would be great. Thanks!
Glenno
I couldn't get this to work at all, even with the sample files. The sample files are confusing as the particular horizon panorama is provided in the installation anyway. I am using SN Pro version 7.5.0.951.
Apologies, there is a bug in SN7 7.5.0. We are rolling out an update in a couple of weeks.
Hang in there!
Hi Keiron,
What's the ETA for the update? It looks like the Windows 10 Anniversary update messed up Open GL -- at least in my case for Starry Night 6 Pro. So, I upgraded to 7, and now the custom horizon I made for 6 doesn't work, even when I follow these instructions. It *almost* works, but comes over inverted?? Anyway, I'm checking daily for an update...
I have been using Starry Night 7 Enthusiast for 2 years now.
I am an expert user of Photoshop.
Follow all the instructions.
SN7 shows a new Local Horizon, but the preview is blank.
WHen selected, instead of the contents of the PNG i see a fancy panorama with grass and trees.
No DDS folder is created.